I needed to be able to use my token generator on my new ChromeBook. This particular model doesn't seem to have Google Play enabled at the moment, so the Android app wasn't an option.
I've used "stoken" for command line SecurID tokens in the past on macOS Sierra. So, I decided I'd compile by hand.
This requires a ChromeBook already in Developer Mode, with a root password and a chronos password established so it is not left insecure!
Open crosh, then run shell.
First, install chromebrew (google it!)
Update it.
Install some prerequisites:
crew install autoconf
crew install automake
crew install nettle
Remount your user partition to allow execute privs:
sudo mount -o remount,exec /home/chronos/user -i
Clone the source for libxml2, you'll need to compile it first:
git clone git://git.gnome.org/libxml2
cd libxml2
./autogen.sh
make
make install
cd ..
Clone the source for stoken:
git clone https://github.com/cernekee/stoken.git
cd stoken
./configure
make
make install
cd ..
Get your sdtid file onto the machine (sd card or Dropbox or something. Don't leave it there when you're done!)
stoken import --file=my.sdtid
It will prompt you for a passphrase if the file has one, then for a new password and to confirm the password. You will enter this password every time you want to generate the token code.
After this, to generate a token, just run stoken and enter your password.
I hope I didn't leave out any crucial steps. This is my summary after a lot of hit-and-miss effort to accomplish this.
Friday, May 19, 2017
Wednesday, March 19, 2014
New Exception Handling Model
My friend Derek and I are working on ideas for a new (or revised) programming language. Tonight we discussed exception handling. We're replacing try/catch/finally with something else, which I will demonstrate below as if it were part of PHP (it isn't!)
  function MyFunction!($x) {

    except ($E) {
      if (is_a($E, 'FileIOException')) {
        return false;
      } else {
        throw($E); // throw to the calling function
      }
    }

    except Special($E) {
      // this is a special exception handler
      resume;
    }


    $f = fopen!('myfile.dat');

    error_log!Special("Ignore this exception\n", 3, '/no_perms.txt');

  }
Ok, so what is this? Just a couple simple concepts:- Only functions declared with a ! after their name are allowed to throw exceptions up to their caller.
- Exceptions thrown by calls made within the current function hit the unnamed (default) except{} handler, unless the function was invoked with a specific handler given after the ! in its name, in which case that handler is called instead.
- Handlers share local scope with the function they belong to, so they can set flags, manipulate local variables, etc.
- You can use return from inside of a handler to end the entire function.
- If an exception handler ends without a return or throw being encountered, execution continues with the statement after the one which triggered the exception.
- You are guaranteed that a function without a ! will never throw an exception when called.
- On the flip side, you are forced to implement an exception handler (even if it is bare minimal) if you want to use a function with the potential of an exception. (This handler could be as simple as throwing the exception to your own caller.)
Is this better? Our goal was to make it easier to know when exceptions are possible (instead of them being surprises), and to make it impossible to accidentally ignore exceptions which could be important.
Sunday, June 30, 2013
My Experiences with iPhone 4. Part 1.
I have been a long-time Android user. But, for reasons too complex to elaborate right here, I've just decided to take the plunge and give the iPhone 4 a try. Yeah, it isn't the newest iPhone, but neither is my Android the newest (it's an LG Optimus Slider with the Ginger kernel installed.)
So far, I love the iPhone, but as with most of my past loves, this relationship is complex.
My initial conclusion is that the iPhone is not designed for humans. This is funny considering "I" sound a lot more personal than a device whose mascot is a robot. I'll attempt to break down specific areas of comparison here:
Behind-the-Scenes Multitasking and Process Management
iPhone: There are many elegant and great things about the iPhone and iOS. Foremost, I am impressed with the speed and stability of the device, and the (hopefully correct) assumption that it will remain just as fast and functional as long as I have it.
Android: I haven't run the newest Android versions, but Android has long had problems due to the way it manages tasks in memory. Background tasks getting stuck, eating up CPU, and taking my device to a crawl have plagued me. I've gone through iterations of different techniques, fixes, and monitors to try to take care of the issue, even multiple firmware versions, but the problem is fundamental. I should never have to worry about this. Effective multi-tasking has been a basic task in personal computing for over a decade now. Android, you are unacceptable in this way. Whatever goal you were trying to solve by auto-loading tasks in the background has been thwarted by the flaws.
The winner in this section is: iPhone!
Music
iPhone: I had very high hopes for the iPhone as a music device. Apple products have been long known for their media-centric nature. The phone even came with a set of earbuds as if to say "I dare you not to use me as a music player, too." Now that I had legitimately bought a piece of Apple tech, I figured I could be part of the club, play that game. I eagerly prepared to copy my mp3's of my 90's music onto it so I could plug it into my car audio system and hit shuffle. Lets try USB. Plugged it in. A filesystem came up! Nice. I don't see a Music folder. That's weird. So I made one. Dropped the mp3 files in. Unmounted, and investigated. The phone sees no music. I do a little Googling on the subject and find out that the only way to add music is through iTunes. I don't run Windows. I run Linux. iTunes and Linux aren't the best of mates. There are a few iTunes substitutes available, and some of them offer promising iPhone detection and look like they'll work, but apparently Apple broke compatibility in one of the iOS updates and it hasn't been able to be fixed since. As a last ditch effort, I tried emailing a song to myself. I can play it from the email, which is better than nothing, but there is no option to save the song or do anything with it except play it. I am very pissed off about this. I am a legit Apple product owner, why must I be treated like a criminal? What arbitrary security does requiring a file to pass through iTunes on Windows or Mac actually provide? If I had one of those platforms, I could still put my music in from mp3 files, so I just don't get it.
Android: Drag and drop your music in. It just works. This is beyond obvious.
The winner in this section is: Android
Texting
iPhone: I use my phone for texting more than anything else. I knew this would be a problem area for me, going into it, but I decided particularly due to the CPU/performance issues that it would be a worthwhile change. I have two major gripes so far. 1) My contact's profile icons aren't used as part of the texting user interface. I miss seeing the faces of my friends as a reminder of who I am talking with at a given moment. 2) There is no reasonable way to input text. I was told by some people, ridiculously, in my opinion, to use Siri to transcribe the text, but alas, I only have an iPhone not an iPhone 4. I feel very crippled in my ability to communicate. It is way faster than it would be if I were a slower typist, but it is a painful process to endure when I know how much simpler it could be.
Android: By allowing third-party keyboards, Android has become home to Swype. With Swype, I can text rapidly (i.e., 30wpm) with one thumb, while barely needing to look at the screen (i.e., while walking or carrying something or working on a project or playing a game.) Without Swype, texting is a two handed ordeal (or a very slow one handed ordeal) that involves a lot of looking at the screen and a lot of correcting typos.
The winner in this section is: Android
Interface Navigation
iPhone: I was prepared to be disappointed here. Of the hard buttons, three of them are devoted to audio. (Vol+, Vol-, and a physical mute switch.) The remaining two buttons are lock/power and home. After some experimentation and being shown a few tricks by friends, the home button (the round one below the screen) is actually three buttons in one:
First usage: A normal press equals "home"... sort of. From any app, this sends you back to the launcher screen you were last on. From any secondary launcher screen, pressing it again takes you to the home screen in the launcher. From the home screen, pressing it again takes you to the search screen.
Second usage: Double tapping takes you to the task manager. After this, another double tap returns you to where you were.
Third usage: A long press invokes Voice Control (Predecessor to Siri?)
While inside Apps, navigation seems mostly acceptable. The back arrow is usually in the upper left corner of a task. I am glad that it is strictly hierarchical, and only present when needed. Some apps break this and instead put a small "Done" button in the upper left which effectively does the same thing while not looking like an arrow. But Facebook, in particular, breaks this by putting done in the upper-right. Why right instead of left? I don't know, but that's probably Facebook's fault more than Apple.
Menus/settings are a much more difficult problem. There just really doesn't seem to be a standard. You have to look aroudn in each app for an icon with three horizontal lines, or a gear, or three dots, or nothing at all perhaps. Going into the "Settings" app gives me Settings areas for a lot of the builtin apps, as well. I'm not sure if this will expand to include third party apps as I add more or not. I hope so, otherwise it seems horribly inconsistent.
(Side Note: I just learned that Home+Power = Screenshot.)
Android: Android navigation was a great idea... when it was still just an idea. Four hard buttons: Home, Menu, Back, and Search. Search is practically never used, but is approximately equivalent to the long-press "Voice Control" on iPhone. Home always goes home, as it should. Menu brings up a menu for the current screen, allowing full screens apps to take up the entire screen real estate while still providing a mechanism to escape into the user interface when needed. When in a Menu, back closes the menu. Here's where it starts to fall apart. Back isn't hierarchical. It's... a mixture. When you're in an app popped up from another app, back takes you back to the app that popped you there to begin with. When you're at the top page in an app, back takes you out of the app to the home screen. Back stores some sort of a stack of locations, and goes back to the previous one, but at the same time, Apps have some limited ability to manage this stack within their own context and override the behavior. Because of this, Back often results in an App looking like it's frozen up, or taking you not back but forward because that was "the last place you were" and having to press it repeatedly to get to the real place you want to go. Android's back button is a messy mess. I know Android has taken steps to fix this in newer releases of the OS, but I haven't had a chance to review those in action yet.
The winner in this section is: Neither.
I am tempted to compare the iPhone to my Android as an actual device. But, that's not fair, because iPhone is both device and operating system, while my particular Android phone is LG's product and and not Google's... If I were comparing devices, however, the iPhone would win in a lot of areas.
I will write more once I've used the iPhone longer. This write-up is after almost 24 hours, and I'm sure I will discover some great new things in the next few days.
Sunday, May 12, 2013
Removing Unity Global Menus, Scroll Bars, Dock and returning to GNOME 2-esque Ambiance or Radiance
I'm back from the dead, after a couple years of not posting, and I'm here today to give you my current script to "fix" Ubuntu 12.10 Quantal Quetzal and 13.04 Raring Ringtail. This script removes Unity's Global Menus, Overlay Scroll Bars, and Dock, and returns to a more GNOME 2-style look while still supporting the Ambiance or Radiance theme.
Download
This is provided AS-IS, without any guarantees of any particular outcome. Please read "what does it do" so you know what you're getting into before you run this:
http://855nerdfix.com/userfiles/fixunity.sh
What does it do?

How to Use FixUnity
If the script completes and you log into the new session type, and the outcome isn't very similar to the screenshot pictures above, let me know what happened and let's figure out how to fix it. I am open to suggestions on how to improve this.
Recent Changes
0.82 - Renamed session type from "Docky" to "Discord" to more represent what I'm trying to accomplish. (This tool is still useful even if you remove Docky from auto start-up and run Gnome Panel only!)
0.81 - Fixed some Compiz settings that weren't applying properly due to the migration to dconf since I first wrote the script.
0.8 - First public release for Ubuntu 12.10 or 13.04.
Download
This is provided AS-IS, without any guarantees of any particular outcome. Please read "what does it do" so you know what you're getting into before you run this:
http://855nerdfix.com/userfiles/fixunity.sh
What does it do?

- Adds a new session type called "Discord"
- Replaces Unity's top panel with GNOME Panel 3. This is not a reversion to GNOME 2's Panel, but the much better version 3 panel which goes mostly unused from what I see. You will notice one major difference from version 2 - you have to hold in Ctrl+Super in order to right click and edit the panel's composition or arrangement.
- Replaces Unity's left panel with Docky as a bottom panel.
- Removes Global Menus.
- Removes Overlay Scrollbars.
- Steals ALT+F1 and ALT+F2 back from Unity and gives them to the Applications menu and the Run Application dialog box.
- Installs Pidgin (because why not?)
- Configures some sane defaults for Compiz.
- Installs Applet Indicator Complete plugin on the top panel. This gives the Panel the ability to use Ubuntu's sexy Mac-like indicators and clock area and system menu.
- Please be aware that this script will turn off the Global Menu and Overlay Scrollbars even for your Unity session type.
How to Use FixUnity
- Download the script from the link above.
- Set execute permissions on the script.
- Run it.
- After it completes, log out of your session, and before logging back in, choose "Discord" as your session type.
- Log in, and wait while the initial login reconfiguration happens.
- Enjoy Ubuntu the way it should have been.
Good luck!
Help Me!
Help Me!
If the script completes and you log into the new session type, and the outcome isn't very similar to the screenshot pictures above, let me know what happened and let's figure out how to fix it. I am open to suggestions on how to improve this.
Recent Changes
0.82 - Renamed session type from "Docky" to "Discord" to more represent what I'm trying to accomplish. (This tool is still useful even if you remove Docky from auto start-up and run Gnome Panel only!)
0.81 - Fixed some Compiz settings that weren't applying properly due to the migration to dconf since I first wrote the script.
0.8 - First public release for Ubuntu 12.10 or 13.04.
Wednesday, February 23, 2011
Google vs Bing
As a computer instructor, I am often asked why I prefer Google over Yahoo or Microsoft's search engine (whatever they are calling it this year). 80% of the world uses Google, which can be a little scary to think about. It would be so easy for them to abuse their power. I will be the first to admit that they have gotten a little less cool in the last five years, and I wish they had an advanced version that had less hand-holding and would let me just get on with my searches, but even with all that, Google is miles above their competition in a few key areas. (I'm not going to really talk about Yahoo here, they have about the same market share as Microsoft, but they have too many ads and they don't try very hard to make their search better than any one else's)
No matter how "evil" Google gets, rest assured that Microsoft has done worse. I should give some of Microsoft's history on here sometime, that would be fun. Let's just say that you don't get to the top of the Business software game by being nice.
Google still has a sense of humor, although it's been getting dimmer over the years, and their April fools jokes are more about highlighting their newest product than having fun, and the Google Doodles are more about public relations than about celebration. But, compared to any of the older corporations, Google is as playful as a puppy.
Google is a friend to Linux and Mac. Because of the other markets that Microsoft is in, they cannot afford to be nice to Linux or Mac, and the more "features" they have that are incompatible the more people who will be unhappy with a move away from windows. Enter Silverlight, .Net, ActiveX and all of their other web products. Try using IE9 on anything but the newest Windows. And, I'm using Google Chrome on my Ubuntu box to write this post.
Lastly, Google's results are better. I have a fun example for you all, and I know it's nothing but one example, but it shows what each company thinks of getting relevant search results to the user, and really, at the end of the day, that's what we are all looking for.
I did a straight image search for the word rose, and then added the color filter of green, and here are the results:


Like I said, this isn't a rigid test, just one example I stumbled on while working on a lesson plan.
No matter how "evil" Google gets, rest assured that Microsoft has done worse. I should give some of Microsoft's history on here sometime, that would be fun. Let's just say that you don't get to the top of the Business software game by being nice.
Google still has a sense of humor, although it's been getting dimmer over the years, and their April fools jokes are more about highlighting their newest product than having fun, and the Google Doodles are more about public relations than about celebration. But, compared to any of the older corporations, Google is as playful as a puppy.
Google is a friend to Linux and Mac. Because of the other markets that Microsoft is in, they cannot afford to be nice to Linux or Mac, and the more "features" they have that are incompatible the more people who will be unhappy with a move away from windows. Enter Silverlight, .Net, ActiveX and all of their other web products. Try using IE9 on anything but the newest Windows. And, I'm using Google Chrome on my Ubuntu box to write this post.
Lastly, Google's results are better. I have a fun example for you all, and I know it's nothing but one example, but it shows what each company thinks of getting relevant search results to the user, and really, at the end of the day, that's what we are all looking for.
I did a straight image search for the word rose, and then added the color filter of green, and here are the results:

Bing has ONE green rose out of fifteen results. You get better results searching for green rose in the first place and ignoring the color filter.

Google has twelve green roses, two pictures from the movie Green Rose, and ONE rose that is not green.
Like I said, this isn't a rigid test, just one example I stumbled on while working on a lesson plan.
Saturday, January 8, 2011
2D Games with Kitten-Fu, Part Three
Alright, so last time I promised you a second cat and some grass for them to walk on. When I originally got this far in my program I just copied and pasted and created a few if statements in order to take care of the second cat, but instead I'm going to use objects because they are going to be more efficient in this case (where the cats aren't significantly different in how they behave.)
Kitten-Fu is at version alpha 17 now, which is what i will be using for this tutorial. The earlier and later versions should be 100% compatible with what we have done so far.
We have two sprites to create before we work on the next bit of programing. The first is a copy of our first cat with some coloring changes. I also changed the head shape and the way the tail waves-this way they will both have a little different character without needing to re-do all that animation work from earlier.
Next, I'll make a ground sprite. I'm not really happy with the way this turned out. I'm thinking of making a new sprite that is just grass and will be placed higher on the screen along with a second sprite of just dirt at the bottom to give it that street fighter pseudo 3D feel. Remember, I am sticking to 4 colors per 16x16 block to help keep the 8bit retro style. Also remember that transparent counts as a color.

Let's start with adding the ground tile, since that's pretty simple. First create the ground stamp:
Next, let's add a for loop that utilizes the stamp we just created and place it at the beginning of our painting section (after we clear the screen, of course)
If you compile your program now, it should display the ground tiles across the bottom of the screen.
So far we have just been using structured programing, meaning the code just goes through in order what we told it to do without employing any fancy code. We're going to get a whole lot fancier in just a bit. The next thing we are going to do is add a second cat. We COULD just copy our code and rename all of our variables with a 1 and 2 after them, but what if we need to add a third or fourth cat? (for example if we were making a kitteny RPG) That would get old really fast as we duplicated all of our code four times. So, to solve that we are going to employ classes.
I'm going to move all of the code having to do with the cat logic and painting into a kitten class. Since I am still fairly new to object oriented programing, I don't really feel like I can explain what I'm doing in very high detail, so I'm just going to show you what I ended up with.
If you don't know what a class is, you can think of it as a cookie cutter that you create with its own variables and functions (these have different names when they are a part of a class ... whatever) Once we have the class/cookie cutter set up, we can use it to create instances of our class (the actual cookies). This way, we can tell the program what a cat should look like and then make as many as we need with minimal needless duplication of code.
If you know HTML at all, this has the same function as CSS does, it's f*ing amazing and lets you do all sorts of cool things to control all your similar processes all at once.
Without further ado, let's look at the kitten class code (this goes right after we include KFu on line 5.) Actually, I take that back, I'm going to be converting the code into object orientedness in two passes. This first will be the game logic, the second will be the painting portion which I will cover in more depth than the game logic. okay, for real this time:
I made framecount into a global variable for now and changed the k1x and k1y variables into just kx and ky (make sure they get changed in all the places you were using them!)
Next, let's make the constructor:
You'll notice that the above code was basically used to declare and initialize the variables that we're using in this class. Go ahead and delete the duplicate variables at the top of main().
At this point we need to create an instance of our kitten class in main(). I'm going to call it kitten1, but you can name it anything you like. Since we are going to add the paint routine to the class, we will need to call it after we create the screen, so go ahead and add this:
And now let's make a method (it's basically a function) which will take our actual game logic code that we reference the kitten in and make it available to use with the class:
Again, you'll want to delete the code that we have now duplicated and replace it with the following:
Before we're done, take a look at the SDL input handling. We use walkleft, walkright and facing there ... we'll need to point these to our kitten1 instance of the kitten class by adding kitten1. in front of each variable.
Okay! Go ahead and compile your code and make sure it still runs at this point before you continue. If you get an error, read it and take a good look at the line number it gives (if it gives one). Make double sure that you didn't leave anything important out like a semi-colon or a brace. If you still can't get it to compile, take a look at the sample code at the end of this post - we are doing some major revisions to the structure of the code and that can be a little confusing at times.
Once you have your code compiling and running again, let's break it again! we're going to turn the painting routine into another method in our class.
Before we start, we need to change the way we declare our slices and stamps again so that we can separate them into variable declarations and variable values just like we did with the other variables.
So, what are those asterisks that we added to our code for? They are memory pointers that we are using to separate the variables. Jeff is possibly changing kfu to make this easier, so I'm not going to try and explain it :-) If you want to know more, read a good introduction to pointers in c++.
Next, we should add the following to the private section of our class:
And the following to our constructor:
Now, we need to make a method that replaces the painting code:
Since we use the variable anim4 in our class method, let's make it a global variable next to framerate for now. And then of course delete the original painting code and point to the class method with the following:
Pretty cool, huh? Make sure your code still runs and debug as necessary.
wooo .. let's take a deep breath and take a look over all the code. Clean up any extra spaces and comment as necessary. Make sure you understand and recognize all of the various parts of the program still.
Now for the fun part, let's add that second kitten!
Kitten-Fu is at version alpha 17 now, which is what i will be using for this tutorial. The earlier and later versions should be 100% compatible with what we have done so far.
The Sprites
We have two sprites to create before we work on the next bit of programing. The first is a copy of our first cat with some coloring changes. I also changed the head shape and the way the tail waves-this way they will both have a little different character without needing to re-do all that animation work from earlier.

Next, I'll make a ground sprite. I'm not really happy with the way this turned out. I'm thinking of making a new sprite that is just grass and will be placed higher on the screen along with a second sprite of just dirt at the bottom to give it that street fighter pseudo 3D feel. Remember, I am sticking to 4 colors per 16x16 block to help keep the 8bit retro style. Also remember that transparent counts as a color.

The Code
Let's start with adding the ground tile, since that's pretty simple. First create the ground stamp:
stamp ground("ground.png");No need to worry about slicing it at this point. When we have more variety then we can convert it, but for now a stamp will work just fine.Next, let's add a for loop that utilizes the stamp we just created and place it at the beginning of our painting section (after we clear the screen, of course)
  for (int i = 0; i < 8; i++) {
    ground.put(i*16, 104);
  }
If you compile your program now, it should display the ground tiles across the bottom of the screen.
So far we have just been using structured programing, meaning the code just goes through in order what we told it to do without employing any fancy code. We're going to get a whole lot fancier in just a bit. The next thing we are going to do is add a second cat. We COULD just copy our code and rename all of our variables with a 1 and 2 after them, but what if we need to add a third or fourth cat? (for example if we were making a kitteny RPG) That would get old really fast as we duplicated all of our code four times. So, to solve that we are going to employ classes.
I'm going to move all of the code having to do with the cat logic and painting into a kitten class. Since I am still fairly new to object oriented programing, I don't really feel like I can explain what I'm doing in very high detail, so I'm just going to show you what I ended up with.
If you don't know what a class is, you can think of it as a cookie cutter that you create with its own variables and functions (these have different names when they are a part of a class ... whatever) Once we have the class/cookie cutter set up, we can use it to create instances of our class (the actual cookies). This way, we can tell the program what a cat should look like and then make as many as we need with minimal needless duplication of code.
If you know HTML at all, this has the same function as CSS does, it's f*ing amazing and lets you do all sorts of cool things to control all your similar processes all at once.
Without further ado, let's look at the kitten class code (this goes right after we include KFu on line 5.) Actually, I take that back, I'm going to be converting the code into object orientedness in two passes. This first will be the game logic, the second will be the painting portion which I will cover in more depth than the game logic. okay, for real this time:
int framecount = 0;

class kitten {
  public:
  int kx;
  int ky;
  int walkleft;
  int walkright;
  int facing;
  kitten();
  void step();
  private:
};
I made framecount into a global variable for now and changed the k1x and k1y variables into just kx and ky (make sure they get changed in all the places you were using them!)
Next, let's make the constructor:
kitten::kitten() {
  kx = 110;
  ky = 88;
  walkleft = 0;
  walkright = 0;
  facing = 0;
}
You'll notice that the above code was basically used to declare and initialize the variables that we're using in this class. Go ahead and delete the duplicate variables at the top of main().
At this point we need to create an instance of our kitten class in main(). I'm going to call it kitten1, but you can name it anything you like. Since we are going to add the paint routine to the class, we will need to call it after we create the screen, so go ahead and add this:
kitten kitten1;
And now let's make a method (it's basically a function) which will take our actual game logic code that we reference the kitten in and make it available to use with the class:
void kitten::step() {
  if (framecount%2 == 0) {
    if (walkleft == 1) {
      kx = (kx - 1);
      if (kx < -16) { kx = 128; }
    }
    if (walkright == 1) {
      kx = (kx + 1);
      if (kx > 128) { kx = -16; }
    }
  }
}
Again, you'll want to delete the code that we have now duplicated and replace it with the following:
kitten1.step();
Before we're done, take a look at the SDL input handling. We use walkleft, walkright and facing there ... we'll need to point these to our kitten1 instance of the kitten class by adding kitten1. in front of each variable.
Okay! Go ahead and compile your code and make sure it still runs at this point before you continue. If you get an error, read it and take a good look at the line number it gives (if it gives one). Make double sure that you didn't leave anything important out like a semi-colon or a brace. If you still can't get it to compile, take a look at the sample code at the end of this post - we are doing some major revisions to the structure of the code and that can be a little confusing at times.
Once you have your code compiling and running again, let's break it again! we're going to turn the painting routine into another method in our class.
Before we start, we need to change the way we declare our slices and stamps again so that we can separate them into variable declarations and variable values just like we did with the other variables.
stamp* sprites;I also got rid of the kitt1 from the name of the variables since that won't make a lot of sense when it is part of a generic class.
sprites = new stamp("kitten1.png", KFU_LOAD_FLIPH | KFU_LOAD_NORMAL);
slice* stand;
stand = new slice(*sprites, 0, 0, 16, 16);
slice* walk[4];
walk[0] = new slice(*sprites, 16, 0, 16, 16);
walk[1] = new slice(*sprites, 32, 0, 16, 16);
walk[2] = new slice(*sprites, 48, 0, 16, 16);
walk[3] = new slice(*sprites, 32, 0, 16, 16);
So, what are those asterisks that we added to our code for? They are memory pointers that we are using to separate the variables. Jeff is possibly changing kfu to make this easier, so I'm not going to try and explain it :-) If you want to know more, read a good introduction to pointers in c++.
Next, we should add the following to the private section of our class:
  stamp* sprites;
  slice* stand;
  slice* walk[4];
And the following to our constructor:
  sprites = new stamp("kitten1.png", KFU_LOAD_FLIPH | KFU_LOAD_NORMAL);
  stand   = new slice(*sprites, 0, 0, 16, 16);
  walk[0] = new slice(*sprites, 16, 0, 16, 16);
  walk[1] = new slice(*sprites, 32, 0, 16, 16);
  walk[2] = new slice(*sprites, 48, 0, 16, 16);
  walk[3] = new slice(*sprites, 32, 0, 16, 16);
Now, we need to make a method that replaces the painting code:
void kitten::paint() {
  if (walkleft == 1) {
    walk[anim4]->put(kx, ky);
  } else if (walkright == 1) {
    walk[anim4]->put(kx, ky, KFU_PUT_FLIPH);
  } else {
    if (facing == 0) {
      stand->put(kx, ky);
    } else {
      stand->put(kx, ky, KFU_PUT_FLIPH);
    }
  }
}
Since we use the variable anim4 in our class method, let's make it a global variable next to framerate for now. And then of course delete the original painting code and point to the class method with the following:
kitten1.paint();
Pretty cool, huh? Make sure your code still runs and debug as necessary.
wooo .. let's take a deep breath and take a look over all the code. Clean up any extra spaces and comment as necessary. Make sure you understand and recognize all of the various parts of the program still.
Now for the fun part, let's add that second kitten!
Tuesday, December 7, 2010
2D Games with Kitten-Fu, Part Two
When we left off in part one, you should have had a kitten that skated across the screen forward and backward. This would be awesome for a hover ship, but let's animate our little cat so that its legs move while it is walking. (oh, I'm also using the KFu alpha 13 library now)
We're going to use a sprite sheet for our cat, so that means adding all of our cat's various poses to a single .png file. I'm going to limit myself to 16x16 for each of the kitten's poses, that way I don't have to keep track of what size I made what, and it helps with the retro look too. Kitten-Fu allows you to specify any size you choose, just make sure you keep good track of your sprites if you make them irregular.

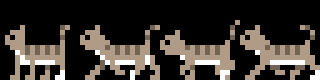
You can see four poses of my cat here. The first is the original position from part one, the second is with the right legs extended, the third is with all four legs in the middle. I was purposely vague on which leg was in front for this middle pose so that I didn't need to draw a second center pose. The last position is with the left legs extended. It took me quite a while to get the animation correct. If you are drawing your own sprites, I would recommend that you get the basic shape you want, then code the animation sequence, and then fine tune it when you can see the changes in action. I used a couple of YouTube videos to help me get the leg shapes correct.
My first attempt at animating my cat was in the middle of the night while I was almost asleep. I'm including it here as an example of what not to do!

So far we've only been working with a KFu stamp, and we really haven't tapped its full potential at all. One of the cooler things a stamp is good for is making "slices". A slice is a piece of a stamp that is cut out and used as a sprite the same way we used the stamp in part one. What makes a slice special is that it doesn't take up more space in memory to use it. We can load one sprite sheet, and then cut multiple slices from it, creating a veritable cornucopia of sprites on the actual screen!
After we add the new kitten poses, we can leave our stamp code the same, but we're going to add our slice code underneath:
We'll also want to change where we put the kitt1 stamp to refer to the slice instead:
Now we're going to use an array of slices for our animated kitten. An array is a way to give a list of items numbers rather than names--this can be quite handy as we will see in a moment. In this case, we're going to pre-load all four frames of our animation, and save them as slices.
You can see that for each slice above (for the animation and the first pose in kitt1stand) there are a couple different parts:
kitt1stand or kitt1walk[x] are both slice names that we use later to call them into use, and after that are our options in the parentheses. kitt1 refers to the stamp that we set up earlier on line 12 of part one. The series of numbers refer to the x-position and y-position (the top left corner of the slice), and the height and width of the slice. Of course the slices could overlap if we wanted them to, but for now that would make our cat look like a mutant.
We can't just replace kitt1stand with kitt1walk, otherwise our kitten would be animated even while it was standing still, so we need a way to tell if the cat is moving, and only show the animated slice array while that is true.
We already have a walkleft and a walkright variable that is set to true while the cat is moving, so we can just multi-purpose them! The way we're going to solve our animation problem for now is to set a counter that will rotate through the numbers 0-3 every x frames. We'll feed this number into the kitt1walk array and this will flip between all of the slices of the array in order. Add the following code right before you clear the display and begin painting. (and, don't forget to add any relevant variable declarations at the top of the program!)
Then, to make the counter tick, add the following to increment the frame counter every time through the game loop (I added it directly underneath the GAME LOGIC heading.)
We can re-use this counter for anything that we want to also run with four frames, as long as we don't mind that it is running in tandem with our cat.
Now that we've set up our animation, let's get it painted to the screen. Add a /// PAINTING /// heading underneath the animation code, and let's add some if statements around where we put kitt1stand. Basically, if walkleft or walkright equal 1, then we display kitt1walk, otherwise we display kitt1stand. I could write out the code for this a little more compactly than I have it below, but since we are about to add flipping, this sets up our statement nicely for that:
If you make your program at this point, you'll notice that the cat, although animated, moves way too fast (even for a ninja cat.) We need a way to slow that kitten down. How about a throttle on the game process? every x frames, we will register a movement. If we were working with smaller pixels, this would be less of a problem, but when your cat moves at 30 pixels per second, and your screen is only 128 pixels across ...
In the GAME LOGIC section, underneath the frame counter, let's stick our movement controls into a throttle of sorts:
Now when you make the file, the cat walks slower but, especially if you're on an older / slower computer, you'll notice that the cat fluctuates in speed depending on your CPU usage. That's because I forgot that we need to use KFu's FPS thingy. To set it up, we need to add the following lines to the top of our actual game code, right after we finish declaring our variables and slices.
Then, at the bottom, right before we flip to the screen, add the following:
we could have named framerate anything, and set the speed to anything we wanted. I can imagine that you could change this number for underwater scenes, or something like that.

Everything should work now except for the fact that your cat can only face one direction! Let's fix that (although, the moonwalking kitten is pretty cool.)
KFu already has options set up to allow for flipping, all we need to do is activate them. First, we need to create a flipped "instance" of our stamp. This creates a complete copy of the stamp in the memory, so don't flip or rotate more than you'll actually need for your program.
Your new stamp declaration should look like this:
FLIPH is for flip horizontal, and then NORMAL is so you can load the regular file. If you don't declare any positional variations, KFu assumes you only wanted NORMAL, but as soon as you start declaring variations, you have to tell it exactly what you want.
Do you remember where we made our if statement a bit long winded for our cat animation? Change your slice code to the following for when the cat is walking right:
Now, the only remaining 'error' is when your cat stops walking, it always faces left ... Using a variable on the key presses, see if you can flip kitt1stand to face the correct direction after he finishes walking. I have a solution in the code included at the bottom of the post--see if you can figure it out without looking.
So, I lied about showing you how to add another cat, that will have to wait until part three. We'll create a kitten object, and work on the logic that will make kitten-2 follow kitten-1, as well as some grass for them to walk on.
You can download everything from part 2 here: kittens-02.tar.gz
* * *
The Sprites
We're going to use a sprite sheet for our cat, so that means adding all of our cat's various poses to a single .png file. I'm going to limit myself to 16x16 for each of the kitten's poses, that way I don't have to keep track of what size I made what, and it helps with the retro look too. Kitten-Fu allows you to specify any size you choose, just make sure you keep good track of your sprites if you make them irregular.

You can see four poses of my cat here. The first is the original position from part one, the second is with the right legs extended, the third is with all four legs in the middle. I was purposely vague on which leg was in front for this middle pose so that I didn't need to draw a second center pose. The last position is with the left legs extended. It took me quite a while to get the animation correct. If you are drawing your own sprites, I would recommend that you get the basic shape you want, then code the animation sequence, and then fine tune it when you can see the changes in action. I used a couple of YouTube videos to help me get the leg shapes correct.
My first attempt at animating my cat was in the middle of the night while I was almost asleep. I'm including it here as an example of what not to do!

The Code
So far we've only been working with a KFu stamp, and we really haven't tapped its full potential at all. One of the cooler things a stamp is good for is making "slices". A slice is a piece of a stamp that is cut out and used as a sprite the same way we used the stamp in part one. What makes a slice special is that it doesn't take up more space in memory to use it. We can load one sprite sheet, and then cut multiple slices from it, creating a veritable cornucopia of sprites on the actual screen!
After we add the new kitten poses, we can leave our stamp code the same, but we're going to add our slice code underneath:
slice kitt1stand(kitt1, 0, 0, 16, 16);
We'll also want to change where we put the kitt1 stamp to refer to the slice instead:
kitt1stand.put(k1x, k1y);
Now we're going to use an array of slices for our animated kitten. An array is a way to give a list of items numbers rather than names--this can be quite handy as we will see in a moment. In this case, we're going to pre-load all four frames of our animation, and save them as slices.
  slice* kitt1walk[4];
  kitt1walk[0] = new slice(kitt1, 16, 0, 16, 16);
  kitt1walk[1] = new slice(kitt1, 32, 0, 16, 16);
  kitt1walk[2] = new slice(kitt1, 48, 0, 16, 16);
  kitt1walk[3] = new slice(kitt1, 32, 0, 16, 16);
You can see that for each slice above (for the animation and the first pose in kitt1stand) there are a couple different parts:
kitt1stand or kitt1walk[x] are both slice names that we use later to call them into use, and after that are our options in the parentheses. kitt1 refers to the stamp that we set up earlier on line 12 of part one. The series of numbers refer to the x-position and y-position (the top left corner of the slice), and the height and width of the slice. Of course the slices could overlap if we wanted them to, but for now that would make our cat look like a mutant.
We can't just replace kitt1stand with kitt1walk, otherwise our kitten would be animated even while it was standing still, so we need a way to tell if the cat is moving, and only show the animated slice array while that is true.
We already have a walkleft and a walkright variable that is set to true while the cat is moving, so we can just multi-purpose them! The way we're going to solve our animation problem for now is to set a counter that will rotate through the numbers 0-3 every x frames. We'll feed this number into the kitt1walk array and this will flip between all of the slices of the array in order. Add the following code right before you clear the display and begin painting. (and, don't forget to add any relevant variable declarations at the top of the program!)
  // ANIMATION //
  if (framecount%8 == 0) {
    ++anim4;
    if (anim4 >= 4) {
      anim4 = 0;
    }
  }
Then, to make the counter tick, add the following to increment the frame counter every time through the game loop (I added it directly underneath the GAME LOGIC heading.)
++framecount;
We can re-use this counter for anything that we want to also run with four frames, as long as we don't mind that it is running in tandem with our cat.
Now that we've set up our animation, let's get it painted to the screen. Add a /// PAINTING /// heading underneath the animation code, and let's add some if statements around where we put kitt1stand. Basically, if walkleft or walkright equal 1, then we display kitt1walk, otherwise we display kitt1stand. I could write out the code for this a little more compactly than I have it below, but since we are about to add flipping, this sets up our statement nicely for that:
  if (walkleft == 1) {
    kitt1walk[anim4]->put(k1x, k1y);
  } else if (walkright == 1) {
    kitt1walk[anim4]->put(k1x, k1y);
  } else {
    kitt1stand.put(k1x, k1y);
  }
If you make your program at this point, you'll notice that the cat, although animated, moves way too fast (even for a ninja cat.) We need a way to slow that kitten down. How about a throttle on the game process? every x frames, we will register a movement. If we were working with smaller pixels, this would be less of a problem, but when your cat moves at 30 pixels per second, and your screen is only 128 pixels across ...
In the GAME LOGIC section, underneath the frame counter, let's stick our movement controls into a throttle of sorts:
if (framecount%2 == 0) {Now when you make the file, the cat walks slower but, especially if you're on an older / slower computer, you'll notice that the cat fluctuates in speed depending on your CPU usage. That's because I forgot that we need to use KFu's FPS thingy. To set it up, we need to add the following lines to the top of our actual game code, right after we finish declaring our variables and slices.
  fps framerate(1000/30);
  framerate.start();
Then, at the bottom, right before we flip to the screen, add the following:
framerate.delay();
we could have named framerate anything, and set the speed to anything we wanted. I can imagine that you could change this number for underwater scenes, or something like that.

Everything should work now except for the fact that your cat can only face one direction! Let's fix that (although, the moonwalking kitten is pretty cool.)
KFu already has options set up to allow for flipping, all we need to do is activate them. First, we need to create a flipped "instance" of our stamp. This creates a complete copy of the stamp in the memory, so don't flip or rotate more than you'll actually need for your program.
Your new stamp declaration should look like this:
stamp kitt1("kitten1.png", KFU_LOAD_FLIPH | KFU_LOAD_NORMAL);FLIPH is for flip horizontal, and then NORMAL is so you can load the regular file. If you don't declare any positional variations, KFu assumes you only wanted NORMAL, but as soon as you start declaring variations, you have to tell it exactly what you want.
Do you remember where we made our if statement a bit long winded for our cat animation? Change your slice code to the following for when the cat is walking right:
kitt1walk[anim4]->put(k1x, k1y, KFU_PUT_FLIPH);
Now, the only remaining 'error' is when your cat stops walking, it always faces left ... Using a variable on the key presses, see if you can flip kitt1stand to face the correct direction after he finishes walking. I have a solution in the code included at the bottom of the post--see if you can figure it out without looking.
So, I lied about showing you how to add another cat, that will have to wait until part three. We'll create a kitten object, and work on the logic that will make kitten-2 follow kitten-1, as well as some grass for them to walk on.
The Files
You can download everything from part 2 here: kittens-02.tar.gz
* * *
Subscribe to:
Posts (Atom)